Eggs that it is.....
Here are some easy ideas for sprucing up your egg decorating this Easter.
Lace dyed eggs – Martha Stewart
Lace dyed eggs – Martha Stewart
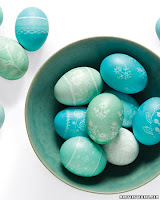 This Easter, take hard-boiled eggs to new heights by embellishing them with lacy patterns. Once the eggs are dyed and dry, pile them in a large bowl to use them as a centerpiece.
 Tools and Materials
* Eggs
* Standard egg dye
* Rubber bands
* Inexpensive lace trimmings or scraps from a worn tablecloth or curtains
* Scissors
* Foam board fitted with flathead pins
How-To
1. Cut lace into strips long enough to wrap around eggs and still have extra to form a sash for holding.
2. Wrap eggs, securing lace with rubber bands. Dye eggs according to dye package instructions.
3. Lift out, cut off rubber bands, and unwrap lace. Let dry on foam board fitted with flat head pins.
Glitter Sticker Eggs
Glitter Sticker Eggs
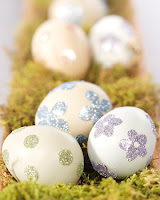 I got this inspiration from MS as well, but her directions were a bit much for me. I would use standard hard boiled eggs and add glittered stickers to them - there are so many great stickers options out there this would be an easy project for anyone to do!
Tissue Paper Eggs – Martha Stewart
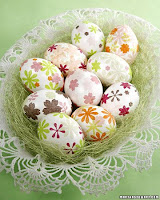
Tools and Materials
*Tissue paper
* Crafter's punch
* Tweezers
* optional Decoupage gel
* Paint brush
How-To
1. Fold tissue paper four times.
2. Punch tissue paper with crafter's punch.
3. Separate layers of flower with tweezers or fingers.
4. Paint a thin layer of decoupage gel onto egg.
5. Pick up punched-out shape with paintbrush. Starting from the middle of the punch-out and working outward, gloss over punch-out using paintbrush with thin layer of decoupage gel.
6. Place egg on drying rack
2. Punch tissue paper with crafter's punch.
3. Separate layers of flower with tweezers or fingers.
4. Paint a thin layer of decoupage gel onto egg.
5. Pick up punched-out shape with paintbrush. Starting from the middle of the punch-out and working outward, gloss over punch-out using paintbrush with thin layer of decoupage gel.
6. Place egg on drying rack
Ribbon Eggs – Better Homes and Gardens
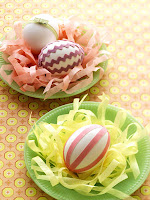 Narrow ribbons and rickrack make instant egg decorations (just adhere with glue). For even easier decorating, look for self-adhesive fabric tape in pretty colors and fun patterns -- a great find from scrap booking supply stores.
Tea Dyed Eggs
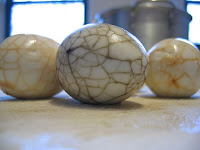 These are really different and lovely to look at. It takes a while to dye them but I think they are worth it!
How to:
1. Wash the eggs in warm soapy water to make sure there aren't any oils or soil on the egg to interfere with coloring. Hard-boil the eggs.
2. Make the dye mix. Pour 1 cup boiling water over at least 2 tea bags and steep for 15 minutes. Squeeze out the tea bags to remove all of the dye and set aside. Add 1 teaspoon of white vinegar to the mix and allow cooling to room temperature.
3. Different teas can be used in different bowls for variety.
4. Gently add eggs to the desired bowls. Make sure each egg has room so that liquid touches all sides.
5. Allow the eggs to float in the tea bowls for at least 1 hour.
6. Lift the eggs out of the bowl and check the coloring on the eggs. Return to the solution if the desired color is not achieved.
7. Carefully remove the egg from solution and lay out to dry. Make sure not to let the eggs touch, an empty egg carton works great here. Try not to touch the eggs until they've had a chance to dry.
Glitter Eggs
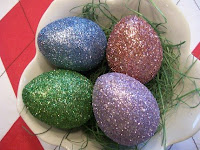 These have to be my favorite of all decorating styles – I love them in soft pastel colors.
Materials:
* Eggs
* Powdered glitter in multiple colours
* Bowls and spoons
* Paintbrush
* Craft glue
How to  1. Blow the yolk and white out of the egg.
1. Blow the yolk and white out of the egg. 2. Brush craft glue onto egg.
3. Gently set egg in bowl of glitter and spoon the glitter over the egg, covering the entire surface.
4. Remove from the bowl and set on waxed paper to dry
So pull up chair, get the kitchen table all set up and enjoy a day filled with decorating!


 It'll help guide your choices for everything from the invitations and decor to the food and drinks. Your theme can be as simple as a favorite color to as specific as an Old Hollywood Glam Cocktail Party, Fortune Telling Party or how about a Vegas inspired setting! Having something in mind will help make the planning process much easier.
 Plan in advance
 A table full of finger food allows for easy munching from the party's start to the big countdown at midnight. Bring out your good china serving pieces for this elegant meal; after all, it isn't often you get an excuse to stay up until midnight to eat
 A cocktail bar with plenty of alcoholic and nonalcoholic options serves as the centerpiece of your New Year's party. Be sure to refill guests' glasses or provide fresh drinks before the toasts. To toast after sipping or with an empty glass is considered bad luck.
 Non-traditional containers provide extra interest at the table. These snacks double as decoration when they're layered in a clear glass vase.
 Toast the New Year with champagne flutes in custom-etched designs. To make your own, wrap self-adhesive vinyl around clean glasses, and use a crafts knife to cut away the design elements (wherever the vinyl remains, the glass will be clear). Apply etching cream, following the manufacturer's instructions.
 At the end of your celebration, present each guest with a small gift tin filled with sweets -- to be savored on the way home or saved for another day.

 Creamy eggnog -- the adult or child-friendly version -- takes center stage in this Frosty vessel made from a large rose bowl. For a temporary design, paint the inside of the glass with melted orange and black chocolate coating. Or, to use the bowl and glasses next year, use glass paint from the crafts store to add the faces to the outside of the glass.
  Serve up sherbet or ice cream in real white chocolate cups that smile back. All you have to do is paint the faces using a small artist's brush and melted chocolate coating.
 A glass of milk takes on new deliciousness with doughnut-hole snowman heads. Outfit powdered doughnut holes with eyes and a nose made of edible food clay. Pierce a hole through the center of the doughnut using a skewer and fit in a straw. Make a miniature scarf for the glass from orange yarn.

 Here are some other great snowman inspired treats!


 Posts
Posts


